


Guest Access


![]()
![]()
 Message [Page 1 of 1]
Administrator
Administrator

Administrator
profile 


 5163
5163
 1247
1247
 2009-10-09
 1974-05-28
 50
50
 8363
8363

Fire Knight


 It's been some time learning the events and scripts that I've slowly become more satisfied with the programming for most of my projects. For me that's only half the distance of completion, there's still a long ways as to go in finishing an original game. You still have the sounds, music, and all of the graphics. Here's how I get started with making graphics for RPG Maker XP +
A TILE
I'm going to make a 32 x 32 pixel square

because the tile set (for making maps) uses 32 x 32 tiles.
A SET OF TILES
When making a set of tiles ~> TILESET
They must be 8 tiles across for each row, so in pixels
32 x 8 = 256
That's 256 pixels across then each row.
The first row is left blank for the auto tiles.
I made this as a sample

Now I'm using these as resource templates to make new resources
for my games and script demos +

G@MeF@Ce
 | ||
profile
516312472009-10-091974-05-28508363Fire Knight
It's been some time learning the events and scripts that I've slowly become more satisfied with the programming for most of my projects. For me that's only half the distance of completion, there's still a long ways as to go in finishing an original game. You still have the sounds, music, and all of the graphics. Here's how I get started with making graphics for RPG Maker XP +A TILE
I'm going to make a 32 x 32 pixel square
because the tile set (for making maps) uses 32 x 32 tiles.
A SET OF TILES
When making a set of tiles ~> TILESET
They must be 8 tiles across for each row, so in pixels
32 x 8 = 256
That's 256 pixels across then each row.
The first row is left blank for the auto tiles.
I made this as a sample
Now I'm using these as resource templates to make new resources
for my games and script demos +
Administrator
Show Signature
Administrator


Administrator
Administrator
Administrator
profile
5163
1247
2009-10-09
1974-05-28
50
8363
Fire Knight
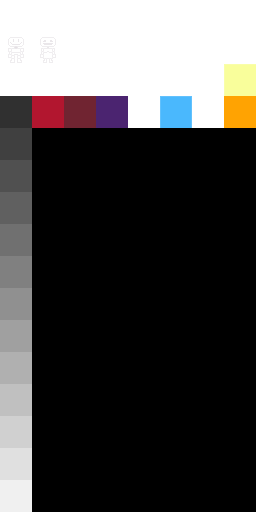
about to make a tile?
try using this as a template for lining things up perfectly

the red and green bars are 16 pixels across.
16 x 2 = 32
the blue line is a 1 pixel border
just have in mind the center is between two pixels.
so make your icons, tiles, characters even by pixel if you want them dead centered.
*tile examples
man ~ woman
 ~
~
heart ~ plus ~ $
 ~
~ ~
~
question ~ door ~ chest
 ~
~ ~
~
individually these 'could' be used as icons,
icons are usually 24x24pixels.
next is to take these tiles and put them together into a tileset...
G@MeF@Ce
| ||
profile
516312472009-10-091974-05-28508363Fire Knight
about to make a tile?try using this as a template for lining things up perfectly
the red and green bars are 16 pixels across.
16 x 2 = 32
the blue line is a 1 pixel border
just have in mind the center is between two pixels.
so make your icons, tiles, characters even by pixel if you want them dead centered.
*tile examples
man ~ woman
~heart ~ plus ~ $
~~question ~ door ~ chest
~~individually these 'could' be used as icons,
icons are usually 24x24pixels.
next is to take these tiles and put them together into a tileset...
Administrator
Show Signature
Administrator
Administrator
Administrator
Administrator
profile
5163
1247
2009-10-09
1974-05-28
50
8363
Fire Knight
again tilesets are 8 tiles across (32x32pixel tiles) so I took the tiles that were just made and made a few lines for the floor, walls, and came up with this platform tileset
I then took the tile of the man and started a character template sheet.
these sheets must be 4 tiles across and only 4 rows facing:
-down
-left
-right
-up
(all rows are facing down for now)
example of tileset, and character
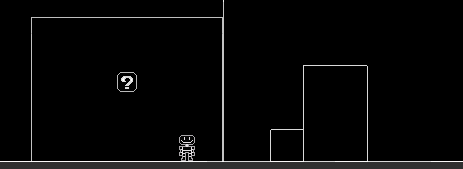
start plain, make sure things line up, then begin to color and style.
G@MeF@Ce
| ||
profile
516312472009-10-091974-05-28508363Fire Knight
again tilesets are 8 tiles across (32x32pixel tiles) so I took the tiles that were just made and made a few lines for the floor, walls, and came up with this platform tilesetI then took the tile of the man and started a character template sheet.
these sheets must be 4 tiles across and only 4 rows facing:
-down
-left
-right
-up
(all rows are facing down for now)
example of tileset, and character
start plain, make sure things line up, then begin to color and style.
Administrator
Show Signature
Administrator
Poster Mcposty
Poster Mcposty

Poster Mcposty
profile 


 1933
1933
387
2010-03-01
1994-04-13
30
1759

M
I like the style that you did this with. The only problem I see is that when you load up the tileset in RPG Maker, the objects are all white and it's really hard to see which tiles are which since the background of the tile-selector thing is gray.
Using just the few that you provided, it can make a nice 2D dungeon-like game.
Also using a flashlight-like event, it creates this:
MotionM
 | ||
profile
19333872010-03-011994-04-13301759M
I like the style that you did this with. The only problem I see is that when you load up the tileset in RPG Maker, the objects are all white and it's really hard to see which tiles are which since the background of the tile-selector thing is gray.Using just the few that you provided, it can make a nice 2D dungeon-like game.
Also using a flashlight-like event, it creates this:
Poster Mcposty
Show Signature
Poster Mcposty

Administrator
Administrator
Administrator
profile
5163
1247
2009-10-09
1974-05-28
50
8363
Fire Knight
 it's a start +
Characters:
In a character sheet there are 4 rows of 4 frames
the 1st row - facing down [stand1][step1][stand2][step2]
taking the 'man character sheet' I began to color the top left man with some flesh tones, I then made a copy for the next frame and dropped the head a pixel, raised a leg and a arm a pixel and dropped the opposite arm a pixel to create the look of taking a step forward.
I now have two frames that I will use for the 3rd and 4th frame.
I flip the 4th frame horizontally to create a step from the other leg.
here's my results

the 4th row - facing up [stand1][step1][stand2][step2]
taking a copy of the top row I make the very bottom row,
using more of the darker shade for the body and lighter shade for the back of the head to create the backside look.
here's my results
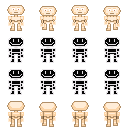
and last
the 2nd row - facing left [stand1][step1][stand2][step2]
and 3rd row - facing right [stand1][step1][stand2][step2]
now you could use this, resize, recolor, edit and make your own character +
G@MeF@Ce
| ||
profile
516312472009-10-091974-05-28508363Fire Knight
thxMotionM wrote:I like the style that you did this with.
it's a start +So far I've done the size of the resources and some samples making certain things line up right, next I'll start with color and design +MotionM wrote:The only problem I see is that when you load up the tileset in RPG Maker, the objects are all white and it's really hard to see which tiles are which since the background of the tile-selector thing is gray.
Characters:
In a character sheet there are 4 rows of 4 frames
the 1st row - facing down [stand1][step1][stand2][step2]
taking the 'man character sheet' I began to color the top left man with some flesh tones, I then made a copy for the next frame and dropped the head a pixel, raised a leg and a arm a pixel and dropped the opposite arm a pixel to create the look of taking a step forward.
I now have two frames that I will use for the 3rd and 4th frame.
I flip the 4th frame horizontally to create a step from the other leg.
here's my results
the 4th row - facing up [stand1][step1][stand2][step2]
taking a copy of the top row I make the very bottom row,
using more of the darker shade for the body and lighter shade for the back of the head to create the backside look.
here's my results
and last
the 2nd row - facing left [stand1][step1][stand2][step2]
and 3rd row - facing right [stand1][step1][stand2][step2]
now you could use this, resize, recolor, edit and make your own character +
Administrator
Show Signature
Administrator
Administrator
Administrator
Administrator
profile
5163
1247
2009-10-09
1974-05-28
50
8363
Fire Knight
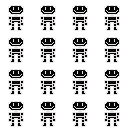
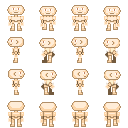
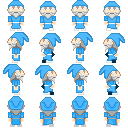
character sheets (continued...)
by using the sprite template I made:
can't see?
better?
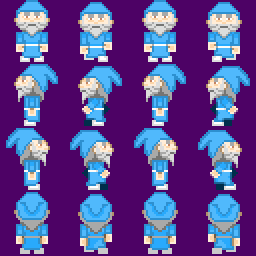
this sprite sheet wasn't much of an edit, it was more like an add on to the template. Everything from the hat, eyes, beard, robe, shoes and belt are separate layers on top of the template +
It may take more time working on a sprite by layers, but I highly recommend that you take the time to do it this way as it will then take much less time for recolors, edits, using different combinations of layers to produce more characters.
some examples:

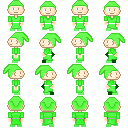
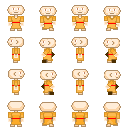
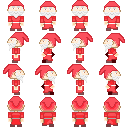
with very little editing, some adjustments to the hue for color change, and saturation, contrast... you could easily create a cast of characters for your game +
and when it comes to making sprites, why wouldn't you want to save yourself some time? after all it's a tedious pixel meticulous process.
G@MeF@Ce
| ||
profile
516312472009-10-091974-05-28508363Fire Knight
character sheets (continued...)by using the sprite template I made:
can't see?
better?
this sprite sheet wasn't much of an edit, it was more like an add on to the template. Everything from the hat, eyes, beard, robe, shoes and belt are separate layers on top of the template +
It may take more time working on a sprite by layers, but I highly recommend that you take the time to do it this way as it will then take much less time for recolors, edits, using different combinations of layers to produce more characters.
some examples:
with very little editing, some adjustments to the hue for color change, and saturation, contrast... you could easily create a cast of characters for your game +
and when it comes to making sprites, why wouldn't you want to save yourself some time? after all it's a tedious pixel meticulous process.
Administrator
Show Signature
Administrator
EVENTALIST
EVENTALIST

EVENTALIST
profile 


 3021
3021
908
2009-12-11
1991-04-18
33
4299

Cleverkat


 Also when doing tile sets check into a built in grid function. Photo shop CS3 has one (crtl+').
Helps quite a bit.
mr_wiggles
 | ||
profile
30219082009-12-111991-04-18334299Cleverkat
Also when doing tile sets check into a built in grid function. Photo shop CS3 has one (crtl+').- Spoiler:

Helps quite a bit.
EVENTALIST
Show Signature
EVENTALIST
![]()
![]() Message [Page 1 of 1]
Message [Page 1 of 1]
GAMEFACE101 » MAKERS » RPG MAKERS » RMXP ( ROLE PLAY GAME MAKER XP ) » RMXP = RESOURCES »RMXP = Getting Graphical

Similar topics
![]()


